Download PDF Here on these instructions containing images.
- Log into the account used by the IT Admin for scan to email.
- Click “Manage your Google Account”.
- Click “Security”
- Click “2-Step Verification”
- Click ” GET STARTED”
- Since you are making a change to the security settings, re-enter the password and click “Next”. (Note: This may happen several times during this entire procedure)
- If you already have a phone # associated with this account it will appear here. If not, enter your cell phone number with the area code. Click “Text Message”. Click “Next”
- You will be prompted to enter the 2-step verification code received by your cell phone. Enter the 6 digit code. Click “Next”
- Click “TURN ON” to enable 2-Step verification. The screen will now show 2-step verification is now enabled.
- Optional: If you click “ADD GOOGLE PROMPT” the message received by your phone allows you to bypass entering a code in Gmail security. Click the back arrow.
- Next add an App Password which will allow an email client (i.e. your bizhub, Outlook, Office 365, Thunderbird, etc.) to bypass the 2-Step verification procedure.
- Click “Next” to App passwords.
- You will be prompted to enter the 2-Step verification received by your phone. Enter the 6-digit code you received (not the number in the image). Click “Next”
- In the Select App pull down menu, select “Other” (custom name).
- Enter a name for the app and device (i.e. KM Scanner)
- Click “GENERATE”
- Gmail will generate a 16 character password. (Note: DO NOT CLICK DONE or you will have to start over. Highlight the password. Right-Click the highlighted password and select “copy”
- Next, save the password in Notepad as a precaution.
- Click “DONE” (on the password screen) when complete.
- Google recommends generating a new password each time an app password is required with 2-Step verification enabled.
- In the upper right of the screen click the 9 dot App Grid.
- Click the Gmail icon
- Use the Gmail settings from the account you created to configure the bizhub to send email. Note: examples of Gmail server settings for email clients can be found in many places on the internet
- Open a new browser window on your computer and type the IP Address of your bizhub into the address field of the browser. Check the radio button for “Administrator” and log-in as Administrator to your bizhub from your computer.
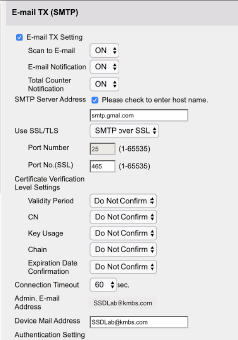
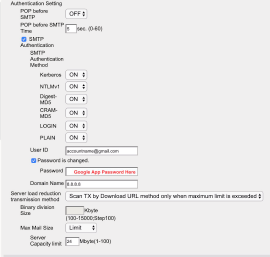
- Select the “Network” section and then click “Email Setting” > “Email TX”.
- Copy the image contained here for correct settings. Use the email and password you created when setting up your new Gmail email address in the previous steps.